Working closely with your printer during the concept stages of a print project allows us to use our experience to assist with cutting costs and reducing production timelines. Here are eight things to consider when designing your next print project:
1. MaximizE The Sheet Size
Maximizing the use of the paper sheet size will reduce waste and production costs. We can assist you with determining the correct size printed piece to use as much of the paper sheet area as possible. An example would be you are wanting to print a 9" w x 6" h card with bleeds. Setting this up on a 26" x 40" sheet of paper we can get 16 cards out and our waste is 3.25" total along the 40" side of the sheet and 1.25" along the 26" side. If we printed that same piece on a digital press, we would have a maximum sheet size of 20" x 14" and would then only be able to print 4 cards instead of 16.
Slightly changing the size of your art can lead to big savings based on sheet sizes. For example, a customer wanted to print some promotional note pads for handing out on sales calls. He asked for a pad of 50 sheets of paper at a size of 5" x 7". But by reducing the size of the note pad to 4" x 6" we can pad these five across at a time instead of three across. This is a savings of almost 40% and sped up the production process as well!
2. Take Advantage of a Work and Turn
Whenever possible, we try to set up conventional print projects using work and turn. This means we are printing both sides of your printed piece on a single run through a press that can flip the paper automatically. Side #1 of you piece will print on the left half of the sheet and side #2 on the right half of the sheet. This reduces the number of printing plates needed and eliminates a wash up on the press that would be needed to start fresh to print the second side on a press that doesn't have the flipping capability.
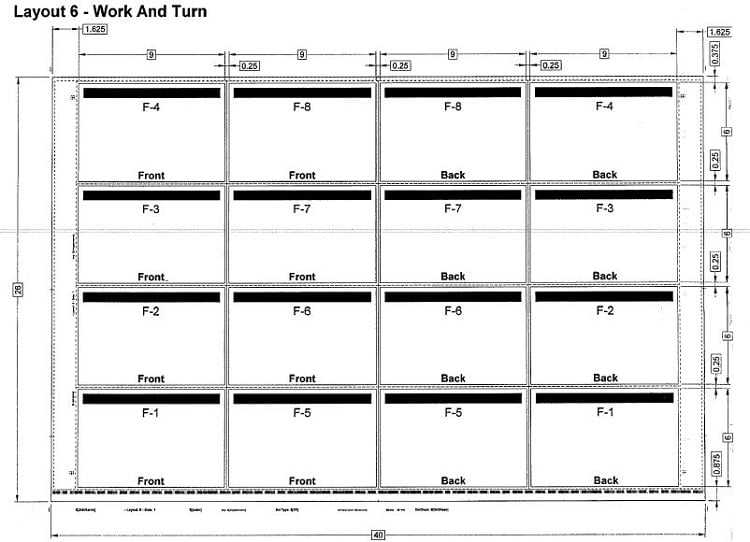
We are not able to utilize work and turn when the coating differs from one side to the other, including printing on a coated 1 side (C1S) stock. Also, if we need to score the piece after printing, we cannot do a work and turn, so the scores can all align from the same side of the piece.
3. Print 4-Color Vs Spot Color
The four basic colors for printing color images are Cyan, Magenta, Yellow, and Black (CMYK). This is referred to as 4-color process or 4CP. A spot or PMS color is a pre-mixed ink of a specific color named by Pantone and is used when you need an exact color. A custom corporate color like Tiffany & Co. blue or colors that cannot be achieved with CMYK are reasons for using a PMS color ink.
Each PMS color of ink needs to be applied separately in its own ink well on the press. You will also need to determine if the stock you are using will be an uncoated sheet or a coated sheet as that will make a difference on its appearance. Adding a spot PMS color to your 4-color process printing adds the additional cost of the ink, mixing of the ink, plus an additional plate for each spot color. Sometimes you must use a spot PMS color for branding reasons, but if you can avoid it you will save on your printing costs.
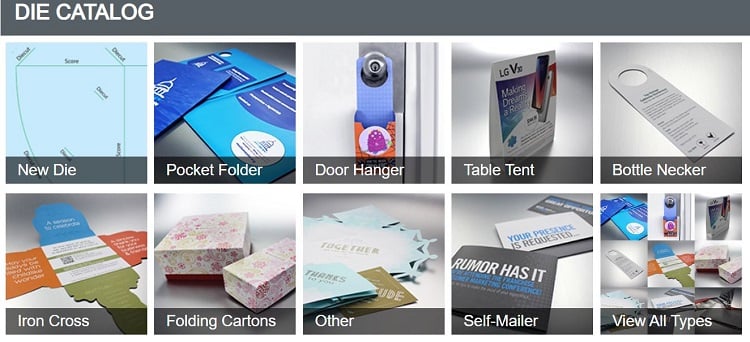
4. Reuse an Existing Die Vs New Die
Some printers have a die library with cut patterns that can be reused. Some of the most popular dies at Suttle-Straus are for pocket folders, infinite folding cards, table tents, self-mailers, door hangers, and iron cross folds.
Another advantage of using a pre-existing die is that we can send you a digital dieline template in Adobe which you can drop in your artwork, saving design time. Learn more about creating dielines here.
A new simple scoring die costs start at around $250 and a complex diecutting and scrapping die can be as much as $1,500. It is always a great idea to check with your printer before finalizing your design to see if they might have an existing die in their library that will suit your needs.
5. Create Machinable Folds
Machine folding will be less expensive than hand folding in almost all cases. Standard folding machines can do Roll, Letter, Double Parallel, Gate, and Double Gate folds. We are also able to ½ fold and ½ fold and refold.
Specialized folding equipment can fold Iron Cross and other die cut pieces and can tip on cards to self-mailers. This piece of equipment is set up with cameras so the tip on card can be matched to the self-mailer for personalized offers. The set-up time on this complex machine is 3 to 3.5 hours, so for smaller quantities this might be the only time hand folding is cheaper than by machine. See examples of low-budget machinable folds.
6. Use Machine Insertable Envelopes
Choosing an envelope that is machine insertable is one of the biggest ways to save money on mailing projects. The two most common envelope flaps that are machine insertable are the commercial flap and the wallet flap. Commercial flaps work well with high-speed inserting equipment and come in a variety of sizes including #9 and #10 envelopes. Wallet flaps are used on A-Series machine insertable envelopes. Envelopes sizes A-6 through A-10 are the most common sizes. Wallet flaps are also available in #9 and #10 sizes as well.
Pointed, Euro, and Square Flap envelopes are not normally machine-insertable and would require hand-inserting of the letter components. Open End, or sometimes called Catalog envelopes are also not machine insertable and would need to be hand inserted and sealed.
If you are mailing large quantities, you will want to be sure to use open-sided envelopes with either a commercial or wallet flap. For more advice on choosing envelopes, see my article, "Impactful Envelopes Can Make All the Difference."
7. Consolidate Your Printing
Many companies plan a month, a quarter, or a full year's worth of marketing campaigns in advance. They know how many envelopes, brochures, and reply pieces they will need. If you know that your components will not change over the course of the year, it might be best to print an entire year's worth of material and store in your printer's warehouse.
In many cases it is less expensive to pay for storage of your preprinted material than it is to print multiple times throughout the year. This also saves the time needed to reprint for the follow up projects as you already have the materials stored and they can be shipped out within 24-48 hours.
8. Choose Paper Wisely
The final area to look for cost savings is in the choice of paper, specifically the grade of paper chosen for a project. When you are deciding on a grade of stock to use, think about how the piece will be used. Is it an annual report to shareholders or a direct mail piece being sent out to an acquisition list? Is the ink coverage light or is it very heavy on the entire piece? Are you using a coating on the piece to give it a special effect like soft touch or dispersion?
Your annual report will likely want to be on a higher grade of stock than your direct mail piece. If you have very heavy coverage, then go with a lower grade paper as it will be covered up by ink. You can still add a coating on the piece to give it a feel of a higher-grade stock. Read more about how to choose paper in "A Novice's Guide to Picking Paper for Print."
Utilize some of these cost saving tips on your next project and get more out of your marketing budget!
Happy Mailing,
Rob