Rectangles and squares are great, but creative people like to think "outside the box." Sometimes four sides, 90-degree corners, and parallel lines are just not enough. That means that it is time to cut… die cut that is.
What is a die cut?
By definition, die cutting is a material-shaping process where flat goods are cut or distorted by a sharp metal edge being pressed into the stock to cut and/or shape it in a specific way.
The most common reasons for die cutting are trimming to a specific shape, adding perforations to promote ideal tearing locations, and scoring the material to control where things fold. All of these give the creator the ability to get the printed piece to function the way it was intended it to.
What is a DieLine?
A dieline is the art file that shows where cuts, perforations and folds need to be made. This dieline is a vector object that should be delivered to your printer in your art files.
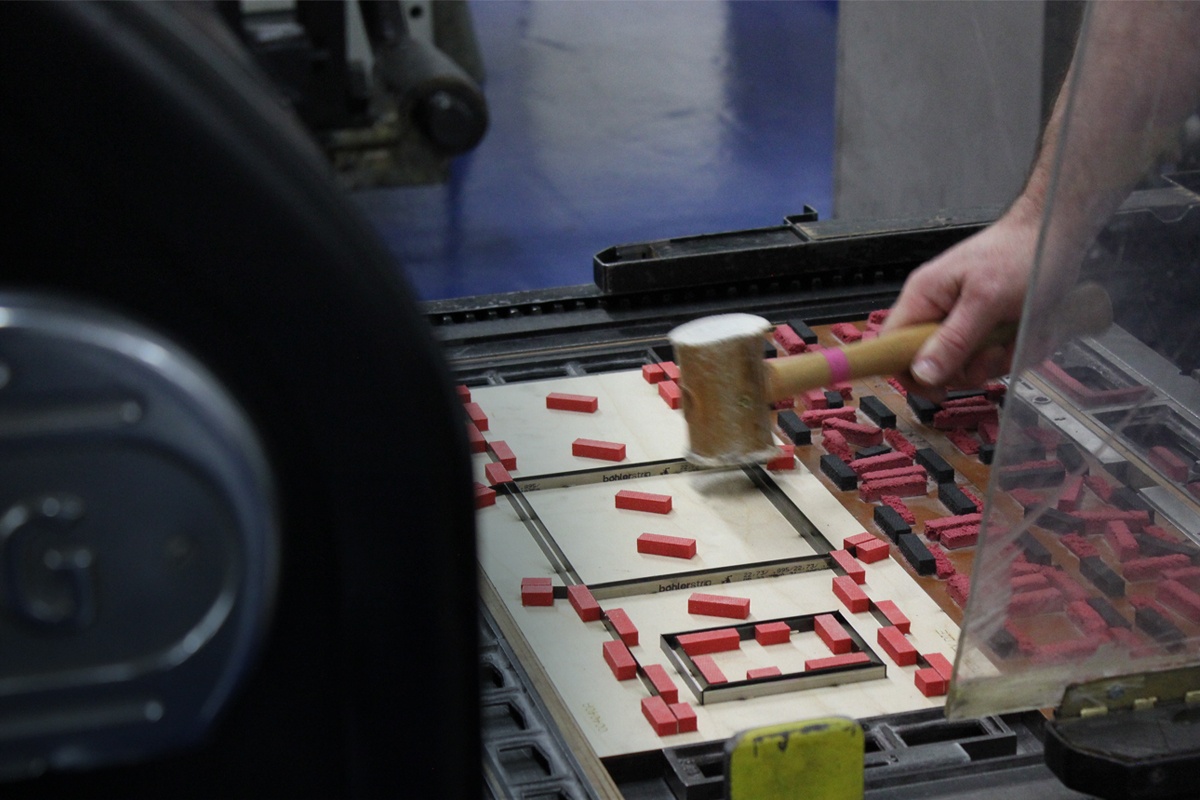
This design will be used to create the metal plate, called a die, that acts like a cookie cutter to shape a printed piece. See die cutting in action in the video below:
Is buying a die always required?
Some simple things can be done without purchasing a die. Straight cuts, scores and perforations that run parallel the length of any side of the sheet can be done without a die. But once those lines curve, bend, change direction or stop before an edge, that is when die cutting is required. Die cutting used to be something that was reserved for high quantity runs due to the cost of the metal dies, but it is now more accessible for shorter runs, including on digital printing with variable data.
See examples of folds that don't require a die in this blog: "Folds Making An Impact on a Budget, No Die Required!"
Most printers have a library of dies from past projects that they keep on hand, especially for routine items like pocket folders and commonly-used folds like an iron cross. So instead of creating a new dieline and paying for a new die, you can take advantage of time and cost savings by using an existing design.
Suttle-Straus has a number of print and mail dieline templates that are free for use. Check out our free dielines.
What makes a die more expensive?
If there are any waste sections in the finished piece that you want to be knocked out, there are two options. You can use a 3-part "knockout die" to achieve this, or the pieces can be held into place using nicks and later removed by hand. Nicks are small gaps in the die that allow just enough paper to hold the piece in place while it moves through the machine. Your printer can help to decide if it will cost more for the special knockout dies or for the extra hand labor to eliminate the nicked pieces.
How do I setup a dieline?
When setting up files for die cutting, it is important to distinguish the dieline from the print design. Creating a spot color in the file that is titled with the name of the operation (die cut, score, or perf) is the ideal way to start. That way when the file is processed, the spot color will stand out from the rest of the design. Try to use a contrasting color so it is easy to identify in the proofing process.
The other way to create separation is by putting the dieline on a separate layer in the design file. That way they can easily be toggled off while adjustments are made to the design. (Just be sure to turn the layer on before submitting the art!) Here is what a dieline layer might look like:
You can use the library function in Adobe to save a set of these dieline spot colors that can be reused in future designs. You can also check with your print provider to see if they have a preferred set available so your files are even more buttoned up before they are sent in.
One important step in finalizing and proofing the dielines is to fold a prototype or mockup to catch any errors. It is ideal to use a similar stock to that of the final printed piece. That way you can compensate for the thickness of the material appropriately.
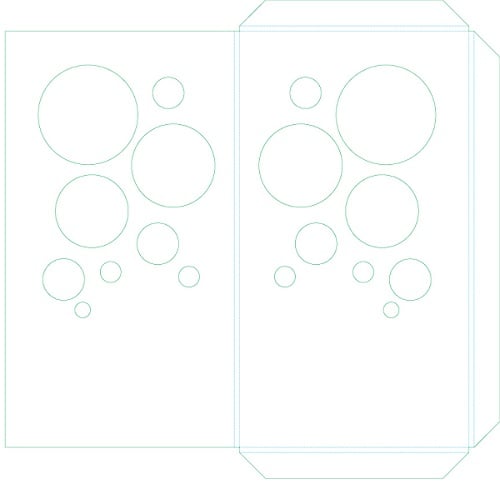
When using thicker paper stocks, it may be necessary to use a capacity, or two parallel folds next to each other, to get the material to fold completely in half. For example, the dieline shown above used a capacity on all four sides in order to enclose a sheet of bubble wrap. Here's the final piece:

It may take a few prototypes to get everything set the way you want it. A finished folded prototype is nice to be able to pass on to your print provider to clear up any questions with the artwork during the production process.
Hopefully this helps give you a better understanding of dielines, and how they are set up. With the ability to manipulate different stocks in their shape and how they fold, unfold, and separate, the possibilities are endless.
When you have a rough dieline ready you can get an estimate on the print and die cutting costs. Or if you need help creating a dieline, our Creative team has lots of experience in designing them.


